Garrattfan's Modelrailroading Pages
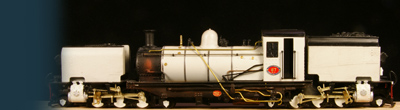
OO9 NGG16
Chapter 02 Gearbox assembly
October 15, 2008 till ....
Next part is most essential for the later performance of the loco. So I'll take my time. I had to anyway as the building was not clear enough to understand immediately. Puzzling over the clues the manual gave, I finally figured out what to do.
The 20T gear are too wide so the molded bosses have to be removed. Right a treated one (2...) |
Again two bearings. The techniques use are essentially the same as with the frame. The holes for the bearings and layshaft (fixed axle, right) must be reamed to size. It is an extremely compact design, left is a pin, which pins it down to a half laundry peg!! (2.7)
|
Cutting the idler gear shaft The manual advises cutting the trailing motor shaft and the idler gear shaft to length with a mini drill fitted with a carborundum slitting disc warning though for heat to melt the plastic parts of the motor. I took no risk and used normal metal saw, slowly cutting the shaft (2.9). The ghost saw is a coincidence. I took away the saw to early when taking the picture, leaving a translucent image. I liked it. It is nearly Halloween anyway ;-)
|
After cutting the idler gear shaft I tipped it with a little super glue and this is the final result. If you work carefully you'll find no trace of binding (2.11)
|
From here I couldn't proceed any further. I have a problem with the worm that does not fit to the motor shaft. While awaiting response from Backwoods I the the frame on its wheels, put the frame end the footplate together (press fitted). Note the protruding brass wire. Contrary to the Backwoods manual I opened this hole so a complete length of wire runs all the way through both frame plates and the gear box, keeping the gearbox in place. (2.11 - 3.1) |
Another view |
| On November 1, 2008 the new worms arrived, so I spent some time on the rear tank, I now could dedicate my time to finishing the gear boxes again. |
After the recption of the worms the entire gearbox was carefully put together first |
Note that I have already painted the brass gearbox |
One motor was "greened" to distinguish the two from each other |
Several speeds in both directions, ten minutes per speed, taking an hour per motor, without the gearbox. Then the motors were attached to the gearbox and extensive trial running and fiddling followed until the gearboxes ran without any trace of binding. |


Sign my
GuestBook